1. Home
  2. Docs
  3. Local Delivery Drivers fo...
  4. Delivery Drivers Panel
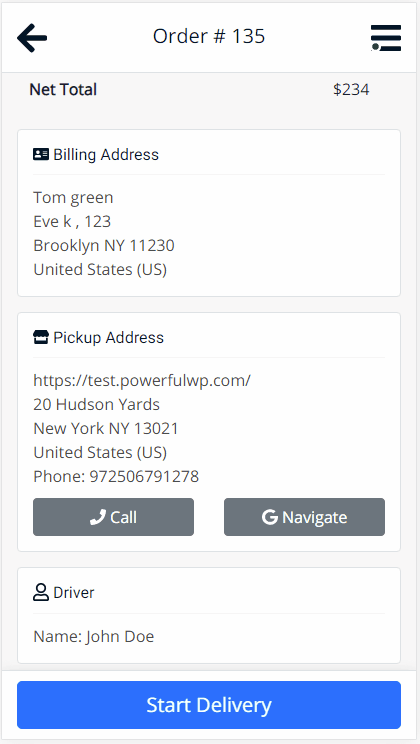
  5. Driver Panel – Start Delivery

Driver Panel – Start Delivery

The Start Delivery screen begins the final phase of a delivery. Once tapped, it updates the system, notifies the customer, and unlocks the tools you need to finish the job. From here, drivers can complete or report a failed delivery each with proof of delivery options.


Overview

This screen is designed to be fast, clear, and mobile-friendly so you can focus on completing the delivery professionally.

When You See the Start Delivery Button

You will see the Start Delivery button if:

  • You are the assigned driver for the order
  • The order status is Out for Delivery

What Happens After Tapping Start Delivery

Once you press Start Delivery, the system performs the following:

Logs the delivery start time
The system records the exact timestamp and adds a note to the WooCommerce order.

Clears previous delivery data
Any previous photo or signature from earlier delivery attempts is removed.

Calculates and displays ETA and distance
Live values pulled from Google Maps appear in your dashboard.

Sends notifications to the customer

  • Email is always sent
  • SMS or WhatsApp are sent if enabled in settings

Starts live location tracking
If “Track Me” is active, your real-time location is shared with the store.

Shows final status buttons
The panel now displays two new buttons:

  • Delivered
  • Not Delivered

Choosing a Delivery Outcome

After starting the delivery, you will decide how it ends by selecting one of the following:

1. Delivered

Tap Delivered when you successfully complete the delivery.
This opens the Proof of Delivery screen, where you can:

  • Write a note (optional)
  • Capture a signature (optional, if enabled)
  • Take or upload a photo (optional, if enabled)

Tap Done to proceed.

You’ll see a confirmation popup:

“Are you sure you want to mark this order as delivered?”

Tap OK to confirm.

After confirming:

  • The order status is updated to Delivered
  • A thank-you screen appears
  • A notification is sent to the customer
  • You are offered two next actions:
    • Drive to Next Delivery – opens the next order’s map
    • View Deliveries – returns to your completed orders list

2. Not Delivered

Tap Not Delivered if the drop-off was not possible.
You’ll see the same Proof of Delivery screen, where you can provide:

  • A reason in the Note field
  • A photo or evidence (optional)

Tap Done, confirm on the popup, and the status will be updated to Failed Delivery.

A notification is sent to the customer and store.

Summary

The Start Delivery screen gives you everything you need to complete the last mile. It starts with a tap, continues with live route details, and ends with a full proof-of-delivery flow—whether the delivery was successful or not.

The process is designed to be fast, reliable, and trackable for both the driver and store.